 Only the rare primary Montessori classroom has a work bench or woodworking tools in the Practical Life area. Some teachers who consider themselves “not handy” are unsure about teaching a skill that they do not feel accomplished in. Others may avoid introducing these activities because of a lack of space or the noise that pounding exercises make.
However, by working with tools, children learn coordination and concentration as well as valuable practical skills. Some simple ways to include these activities in your classroom follow.
Preliminary Activities
Even the youngest child can begin to learn the skills of a carpenter by hammering, drilling, sawing, manipulating screws, or sanding. Most children are fascinated with any such activity being done around home or school, and often spend time watching and asking questions of the workers. This interest transfers to a desire to do the same.
Before using real tools, the child can develop the needed coordination and interest by using a wooden mallet to hammer tees into clay or pegs into a toy cobbler’s bench. By manipulating nuts and bolts or working with the bolt boards, children learn how screws work before the introduction of the screwdriver or vise. Use matching games, group lessons or books to introduce the names of tools, their uses, and safety principles.
A Hammering Lesson
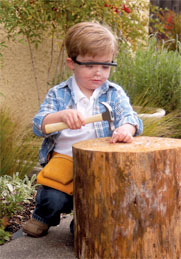
Choose an outdoor location or a corner of the classroom for your tree stump or large log (well-aged, with wood soft enough for successful hammering, available from your local tree service or firewood company). You’ll need safety glasses (for both you and the child), a hammer (7 or 8 ounces in weight with tape on the handle marking where to grasp), a small box with several large-headed nails (roofing nails work well), and a toolbox or tray to hold all the equipment. For safety reasons, this activity is initially kept in the teacher’s cupboard rather than on the open shelf.
- Invite the child to learn to hammer a nail.
- Take the tools to the log or tree stump and set them down.
- Remove the safety glasses from the tray, both yours and the child’s. Put them on and explain that they are always worn with woodworking activities.
- Take the hammer and demonstrate how and where to hold it. Hand it to the child so he can grasp it and feel its weight.
- Remove one nail from the box. Holding the nail with thumb and index finger, tap the head lightly with the hammer until the nail stands up in the wood. Remove fingers from the nail and hit more firmly, repeating until the nail head is flush with the wood.
- Ask the child if she would like to hammer a nail. Stay present as she works. (Some children may need adults to initially set the nail in place.)
- Observe for safety and future lesson pointers.
Remember, children seldom have an end result in mind as they enjoy the action and repetition of the exercise. Concentration and coordination are improving. This activity is especially suited for the active child who is in need of large-muscle activities.
Large or Small Construction Projects
As children perfect their skills and mature, they might help with small repair tasks at school such as screwing in a hook or latch, hammering a loose fence post, or helping to build a birdfeeder or birdhouse. Parent volunteers or special teachers might work with one or two children on a project. The extensions include many other activities such as drawing plans, gathering supplies, measuring, drilling, gluing and clamping, leveling, and squaring off corners. (Many ideas are included in the woodworking books on our website.)
Tips for Success
As always, develop your lesson around what you wish the children to learn. Practice first to be certain everything works successfully. Tools are child-size, but real. Demonstrate the process carefully and precisely, keeping all the safety issues in mind. Lessons should include the use of safety glasses for all woodworking exercises as well as the proper care and storage of the tools.
Like all of the Practical Life exercises, woodworking helps children develop skills and a sense of accomplishment. Indeed, they are learning how to live and be responsible in both the classroom and the world.